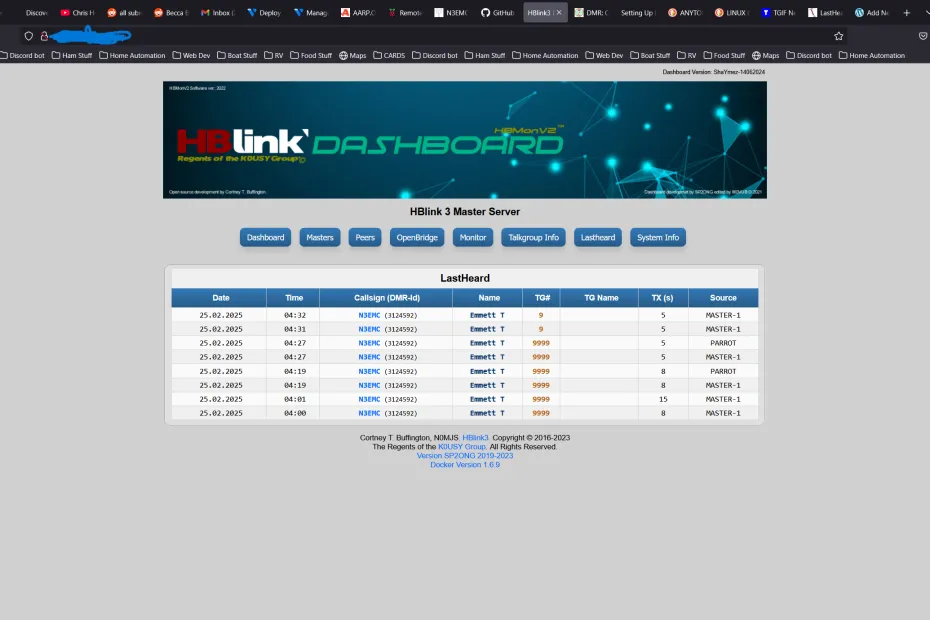
I recently found out about hblink and how it can be set up as a private DMR server or as a bridge from a repeater to a DMR network like Brandmeister, xlx or just about any digital network in use today.
My needs are for just a private server to talk to friends off of the major DMR networks plus I was curious how hblink works. So I decided to set up my own server running HBlink. Here are a few tips I picked up along the way and some pitfalls.
The first 3 days / What didn’t work
I originally tried to install hblink3 on a Raspberry Pi 5 running the latest Pi OS. This was a huge failure. I just couldn’t make it work right. I’d get close and some python thing would be broken and after spending hours trying to figure out how to fix that problem something else would break. There are instructions at this link to set up the server in a python virtual environment. Maybe you’ll have better luck. https://www.billmongan.com/posts/2025/01/hblink/
I gave up on the Pi5 and tried to follow the directions from this YouTube channel (seems to be the go to channel from what I could find) https://www.youtube.com/@chood73 This probably would have worked but it was focused more on setting HBlink up as a bridge and that is not what I wanted to do.
What Worked
I made an account at https://vultr.com and set up a cloud server running Debian 11. I then followed the directions from the developer’s github to install hblink3 in docker. https://github.com/ShaYmez/hblink3-docker-install
Follow every step in the directions the developer provided. Then when you get to the part to edit the hblink.cfg file and the rules.py file make these changes or make your files look like this:
# PROGRAM-WIDE PARAMETERS GO HERE
# PATH - working path for files, leave it alone unless you NEED to change it
# PING_TIME - the interval that peers will ping the master, and re-try registraion
#           - how often the Master maintenance loop runs
# MAX_MISSED - how many pings are missed before we give up and re-register
#           - number of times the master maintenance loop runs before de-registering a peer
#
# ACLs:
#
# Access Control Lists are a very powerful tool for administering your system.
# But they consume packet processing time. Disable them if you are not using them.
# But be aware that, as of now, the configuration stanzas still need the ACL
# sections configured even if you're not using them.
#
# REGISTRATION ACLS ARE ALWAYS USED, ONLY SUBSCRIBER AND TGID MAY BE DISABLED!!!
#
# The 'action' May be PERMIT|DENY
# Each entry may be a single radio id, or a hypenated range (e.g. 1-2999)
# Format:
#       ACL = 'action:id|start-end|,id|start-end,....'
#               --for example--
#       SUB_ACL: DENY:1,1000-2000,4500-60000,17
#
# ACL Types:
#       REG_ACL: peer radio IDs for registration (only used on HBP master systems)
#       SUB_ACL: subscriber IDs for end-users
#       TGID_TS1_ACL: destination talkgroup IDs on Timeslot 1
#       TGID_TS2_ACL: destination talkgroup IDs on Timeslot 2
#
# ACLs may be repeated for individual systems if needed for granularity
# Global ACLs will be processed BEFORE the system level ACLs
# Packets will be matched against all ACLs, GLOBAL first. If a packet 'passes'
# All elements, processing continues. Packets are discarded at the first
# negative match, or 'reject' from an ACL element.
#
# If you do not wish to use ACLs, set them to 'PERMIT:ALL'
# TGID_TS1_ACL in the global stanza is used for OPENBRIDGE systems, since all
# traffic is passed as TS 1 between OpenBridges
[GLOBAL]
PATH: ./
PING_TIME: 5
MAX_MISSED: 3
USE_ACL: True
REG_ACL: PERMIT:ALL
SUB_ACL: DENY:1
TGID_TS1_ACL: PERMIT:ALL
TGID_TS2_ACL: PERMIT:ALL

# NOT YET WORKING: NETWORK REPORTING CONFIGURATION
#   Enabling "REPORT" will configure a socket-based reporting
#   system that will send the configuration and other items
#   to a another process (local or remote) that may process
#   the information for some useful purpose, like a web dashboard.
#
#   REPORT - True to enable, False to disable
#   REPORT_INTERVAL - Seconds between reports
#   REPORT_PORT - TCP port to listen on if "REPORT_NETWORKS" = NETWORK
#   REPORT_CLIENTS - comma separated list of IPs you will allow clients
#       to connect on. Entering a * will allow all.
#
# ****FOR NOW MUST BE TRUE - USE THE LOOPBACK IF YOU DON'T USE THIS!!!****
[REPORTS]
REPORT: True
REPORT_INTERVAL: 30
REPORT_PORT: 4321
REPORT_CLIENTS: *

# SYSTEM LOGGER CONFIGURAITON
#   This allows the logger to be configured without chaning the individual
#   python logger stuff. LOG_FILE should be a complete path/filename for *your*
#   system -- use /dev/null for non-file handlers.
#   LOG_HANDLERS may be any of the following, please, no spaces in the
#   list if you use several:
#       null
#       console
#       console-timed
#       file
#       file-timed
#       syslog
#   LOG_LEVEL may be any of the standard syslog logging levels, though
#   as of now, DEBUG, INFO, WARNING and CRITICAL are the only ones
#   used.
#
[LOGGER]
LOG_FILE: hblink.log
LOG_HANDLERS: file-timed,console-timed
LOG_LEVEL: INFO
LOG_NAME: HBlink

# DOWNLOAD AND IMPORT SUBSCRIBER, PEER and TGID ALIASES
# Ok, not the TGID, there's no master list I know of to download
# This is intended as a facility for other applcations built on top of
# HBlink to use, and will NOT be used in HBlink directly.
# STALE_DAYS is the number of days since the last download before we
# download again. Don't be an ass and change this to less than a few days.
[ALIASES]
TRY_DOWNLOAD: True
PATH: ./json/
PEER_FILE: peer_ids.json
SUBSCRIBER_FILE: subscriber_ids.json
TGID_FILE: talkgroup_ids.json
PEER_URL: https://radioid.net/static/rptrs.json
SUBSCRIBER_URL: https://radioid.net/static/users.json
STALE_DAYS: 28

# OPENBRIDGE INSTANCES - DUPLICATE SECTION FOR MULTIPLE CONNECTIONS
# OpenBridge is a protocol originally created by DMR+ for connection between an
# IPSC2 server and Brandmeister. It has been implemented here at the suggestion
# of the Brandmeister team as a way to legitimately connect HBlink to the
# Brandemiester network.
# It is recommended to name the system the ID of the Brandmeister server that
# it connects to, but is not necessary. TARGET_IP and TARGET_PORT are of the
# Brandmeister or IPSC2 server you are connecting to. PASSPHRASE is the password
# that must be agreed upon between you and the operator of the server you are
# connecting to. NETWORK_ID is a number in the format of a DMR Radio ID that
# will be sent to the other server to identify this connection.
# other parameters follow the other system types.
#
# ACLs:
# OpenBridge does not 'register', so registration ACL is meaningless.
# Proper OpenBridge passes all traffic on TS1.
# HBlink can extend OPB to use both slots for unit calls only.
# Setting "BOTH_SLOTS" True ONLY affects unit traffic!
# Otherwise ACLs work as described in the global stanza
[OBP-1]
MODE: OPENBRIDGE
ENABLED: False
IP:
PORT: 62035
NETWORK_ID: 3129100
PASSPHRASE: password
TARGET_IP: 1.2.3.4
TARGET_PORT: 62035
BOTH_SLOTS: True
USE_ACL: True
SUB_ACL: DENY:1
TGID_ACL: PERMIT:ALL

# MASTER INSTANCES - DUPLICATE SECTION FOR MULTIPLE MASTERS
# HomeBrew Protocol Master instances go here.
# IP may be left blank if there's one interface on your system.
# Port should be the port you want this master to listen on. It must be unique
# and unused by anything else.
# Repeat - if True, the master repeats traffic to peers, False, it does nothing.
#
# MAX_PEERS -- maximun number of peers that may be connect to this master
# at any given time. This is very handy if you're allowing hotspots to
# connect, or using a limited computer like a Raspberry Pi.
#
# ACLs:
# See comments in the GLOBAL stanza
[MASTER-1]
MODE: MASTER
ENABLED: True
REPEAT: True
MAX_PEERS: 10
EXPORT_AMBE: False
IP:
PORT: 62030
PASSPHRASE: passw0rd
GROUP_HANGTIME: 5
USE_ACL: True
REG_ACL: DENY:1
SUB_ACL: DENY:1
TGID_TS1_ACL: PERMIT:ALL
TGID_TS2_ACL: PERMIT:ALL

# PEER INSTANCES - DUPLICATE SECTION FOR MULTIPLE PEERS
# There are a LOT of errors in the HB Protocol specifications on this one!
# MOST of these items are just strings and will be properly dealt with by the program
# The TX & RX Frequencies are 9-digit numbers, and are the frequency in Hz.
# Latitude is an 8-digit unsigned floating point number.
# Longitude is a 9-digit signed floating point number.
# Height is in meters
# Setting Loose to True relaxes the validation on packets received from the master.
# This will allow HBlink to connect to a non-compliant system such as XLXD, DMR+ etc.
#
# ACLs:
# See comments in the GLOBAL stanza
[PARROT]
MODE: PEER
ENABLED: True
LOOSE: True
EXPORT_AMBE: False
IP: 127.0.0.1
PORT: 62031
MASTER_IP: 127.0.0.1
MASTER_PORT: 54100
PASSPHRASE: passw0rd
CALLSIGN: ECHO
RADIO_ID: 9999
RX_FREQ: 434000000
TX_FREQ: 434000000
TX_POWER: 10
COLORCODE: 1
SLOTS: 2
LATITUDE: 33.0000
LONGITUDE: -84.0000
HEIGHT: 75
LOCATION:
DESCRIPTION:
URL:
SOFTWARE_ID: 20230806
PACKAGE_ID: MMDVM_HBlink3
GROUP_HANGTIME: 5
OPTIONS:
USE_ACL: False
SUB_ACL: DENY:1
TGID_TS1_ACL: PERMIT:ALL
TGID_TS2_ACL: PERMIT:ALL

[REPEATER-1]
MODE: PEER
ENABLED: False
LOOSE: False
EXPORT_AMBE: False
IP:
PORT: 54001
MASTER_IP: 172.16.1.1
MASTER_PORT: 54000
PASSPHRASE: homebrew
CALLSIGN: M1ABC
RADIO_ID: 2350000
RX_FREQ: 449000000
TX_FREQ: 444000000
TX_POWER: 25
COLORCODE: 1
SLOTS: 1
LATITUDE: 38.0000
LONGITUDE: -095.0000
HEIGHT: 75
LOCATION: United Kingdom
DESCRIPTION: This is a very cool repeater
URL: www.freestar.network
SOFTWARE_ID: 20230103
PACKAGE_ID: MMDVM_HBlink3
GROUP_HANGTIME: 5
OPTIONS:
USE_ACL: True
SUB_ACL: DENY:1
TGID_TS1_ACL: PERMIT:ALL
TGID_TS2_ACL: PERMIT:ALL

[XLX-1]
MODE: XLXPEER
ENABLED: False
LOOSE: True
EXPORT_AMBE: False
IP:
PORT: 54002
MASTER_IP: 172.16.1.1
MASTER_PORT: 62030
PASSPHRASE: passw0rd
CALLSIGN: M1ABC
RADIO_ID: 2350000
RX_FREQ: 449000000
TX_FREQ: 444000000
TX_POWER: 25
COLORCODE: 1
SLOTS: 1
LATITUDE: 38.0000
LONGITUDE: -095.0000
HEIGHT: 75
LOCATION: United Kingdom
DESCRIPTION: This is a very cool repeater
URL: www.w1abc.org
SOFTWARE_ID: 20230103
PACKAGE_ID: MMDVM_HBlink3
GROUP_HANGTIME: 5
XLXMODULE: 4004
USE_ACL: True
SUB_ACL: DENY:1
TGID_TS1_ACL: PERMIT:ALL
TGID_TS2_ACL: PERMIT:ALL
You’ll notice PARROT is in all caps. In the original it is Parrot this will not work! Make it all CAPS. If you are using vultr to host your server this setup works if you are hosting your own server there maybe tweaks needed.
The rules.py file needs all of the rules changed or deleted and copy paste from below to match these rules. KEEP THE INDENTS AND SPACING THE SAME AS THE ORGINIAL
BRIDGES = {
    'PRIVATE_TG': [
        {'SYSTEM': 'MASTER-1', 'TS': 2, 'TGID': 9, 'ACTIVE': True, 'TIMEOUT': 2, 'TO_TYPE': 'NONE', 'ON': [9], 'OFF': []}
    ],
    'PARROT': [
        {'SYSTEM': 'MASTER-1', 'TS': 2, 'TGID': 9999, 'ACTIVE': True, 'TIMEOUT': 2, 'TO_TYPE': 'NONE', 'ON': [9999], 'OFF': []},
        {'SYSTEM': 'PARROT', 'TS': 2, 'TGID': 9999, 'ACTIVE': True, 'TIMEOUT': 2, 'TO_TYPE': 'NONE', 'ON': [9999], 'OFF': []}
    ]
}
If you want to add TG’s just add them to the rules.py file like this example below. You can see I added TG8 as an example:
BRIDGES = {
    'PRIVATE_TG': [
        {'SYSTEM': 'MASTER-1', 'TS': 2, 'TGID': 9, 'ACTIVE': True, 'TIMEOUT': 2, 'TO_TYPE': 'NONE', 'ON': [9], 'OFF': []}
    ],
    'PARROT': [
        {'SYSTEM': 'MASTER-1', 'TS': 2, 'TGID': 9999, 'ACTIVE': True, 'TIMEOUT': 2, 'TO_TYPE': 'NONE', 'ON': [9999], 'OFF': []},
        {'SYSTEM': 'PARROT', 'TS': 2, 'TGID': 9999, 'ACTIVE': True, 'TIMEOUT': 2, 'TO_TYPE': 'NONE', 'ON': [9999], 'OFF': []}
    ],
    'PRIVATE_TG': [
        {'SYSTEM': 'MASTER-1', 'TS': 2, 'TGID': 8, 'ACTIVE': True, 'TIMEOUT': 2, 'TO_TYPE': 'NONE', 'ON': [8], 'OFF': []}
    ]
}
Just make sure to keep the indentation correct and you need the opening {, the opening [ and the closing ] and } the comma’s between tg’s ], and no comma for the closing ]
If you followed the instruction above to install hblink in docker you’ll have a GUI menu to make the above changes from. After you make the changes select Restart then once it restarts tab down to Cancel and exit the GUI menu. Hblink is paused when this menu is open so make sure to TAB to Cancel once you are done making your changes.
This method also installs HBmonv2 so you can now point your web browser to the IP of the server you installed HBlink3 on and you should see your dashboard.
Now all you have to do is make your PI-STAR work with Hblink. To do that click Configuration – Expert – DMR-GW. For mine I just edited the spot for hblink to have the following info
[DMR Network 3]
Enabled=1
Name=HBLink
Address=<---- Your Server Ip ---->
Port=62030
TGRewrite0=2,60009,2,9,2
TGRewrite1=2,69999,2,9999,1
Password="passw0rd"
Location=0
Debug=0
TGRewrite0=2,11,2,11,1This setup gives you two talk groups on your own DMR server TG 9 and TG 9999 the Parrot TG. On your DMR radio manually enter a TG (on anytone 878 hold 0 and type in the TG number) 69999 to talk to your hblink parrot server. You should get a parrot of what you said back once you unkey the radio. To enter TG 9 manually enter TG 60009 and that should put you in TG 9 on your private DMR server. You can add more talk groups by adding them to your rules.py file following the tg’s outlined above (9 and 9999).
I have no idea how the pi-star works with the rewrite except by putting TGRewrite0=2,60009,2,9,2 makes the pi star take tg 60009 from your radio and direct it to tg 9 on your hblink server. Same goes for the parrot tg 9999. I know there is a way to make it rewrite all the tg’s that start with 6 and are 5 digits and send them to your own server but I haven’t figured it out yet. So if you add more talk groups to your hblink server you’ll need to either figure that out on the pi star or add a line i.e TGRewrite2=2,6000X,2,X,2 where X is the TG number for each TG you add to your own server. Maybe you should read the wiki on TGRewrite and make life easier for yourself hi hi.
Edit 2-26-2025
I figured out the rewrites for pi-star with help of a bridgecom Youtube video and by looking at some of the other servers I had in my pi-star config file. https://www.youtube.com/watch?v=y9T6FAJM3mE&t
TGRewrite0=2,60001,2,1,99999
TGRewrite1=2,69999,2,99999
PCRewrite0=2,69999,2,9999,1
SrcRewrite0=2,1,2,60001,99999
SrcRewrite1=2,69999,2,69999,1The above will take Talk Group 60001 and change it to 1 to send from the pi-star to your HBlink server. It also makes a blanket change so any talk group that starts with 6 and is up to 5 digits long gets the 6 and any unused numbers stripped. You can change this to be a larger number if you need i.e 8 or 9 digits. So if I want to talk to BM TG 3100 in my radio code plug I set tg 63100 – key up the radio PI star see’s 63100 and changes it to 3100 so hblink see’s tg 3100 and when hblink sends back something from tg 3100 pi star sends it to 63100 in my radio.
Here is my whole stanza for hblink in pi-star:
[DMR Network 3]
Enabled=1
Name=HBLink
Address=<---- Your Own IP to hblibk ---->
Port=62030
TGRewrite0=2,60001,2,1,99999
TGRewrite1=2,69999,2,99999
PCRewrite0=2,69999,2,9999,1
SrcRewrite0=2,1,2,60001,99999
SrcRewrite1=2,69999,2,69999,1
Password="passw0rd"
Location=0
Debug=0All of this setup is based on using a radio on TimeSlot 2 if you use TS 1 make the changes you need to the above configs. rules.py and the pi star config. Basically change the 2’s to 1’s where needed.
Hope this helps someone else!
I used the following sites to complete this project:
https://www.billmongan.com/posts/2025/01/hblink/
https://github.com/ShaYmez/hblink3-docker-install
https://dvswitch.groups.io/g/HBlink/topic/newbie_setting_up_private_dmr/75273923
I added a second part to this where we connect to the Brandmeister network with our HBlink server. That post can be found here. HBlink3 part 2 Link to Brandmeister
 English