Make your own trunking Scanner.
Discouraged by the high price of a commercial trunking police scanner? With an RTL-SDR dongle, a Raspberry Pi 5, a touch screen display, and a little bit of your time you can make your own that performs just as well or better than a $600 scanner. Using the software SDRTrunk and RDIO-Scanner you can make your own police / fire or even DMR scanner. SDRtrunk supports both digital and analog systems but really excels with P25 systems and DMR radio used on ham radio repeaters. Each RTL-SDR dongle supports 2.5Mhz of bandwidth so if your local system is wider than that OR if you want to monitor two systems that are further apart than 2.5Mhz you will need more than one dongle. My system in a major metropolitan area works well with one dongle. Check Radio Reference for details on your local systems and to see what protocol they use.
Parts List:
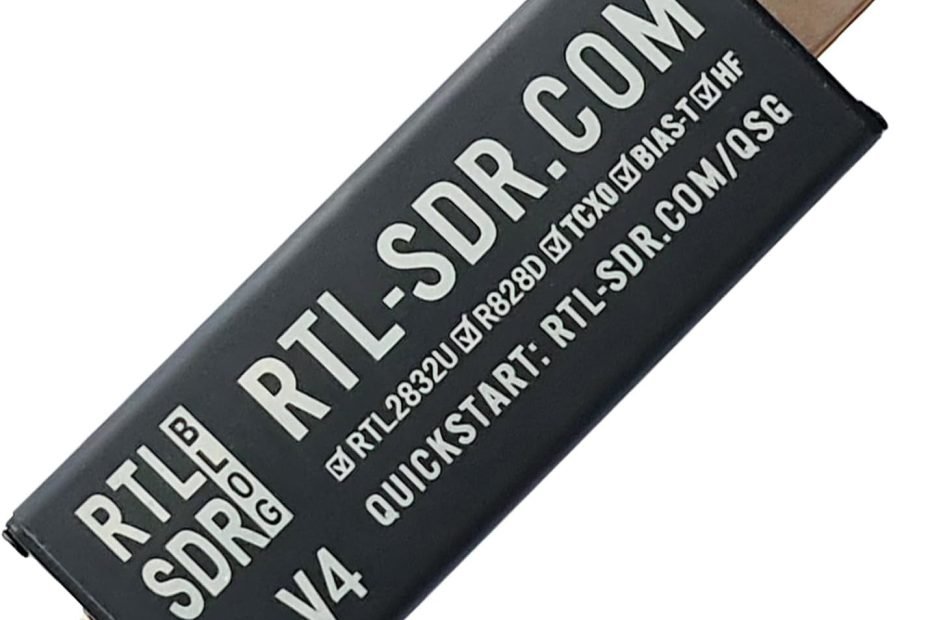
- RTL-SDR V4. This is the newest version of the RTL-SDR Blog.
Amazon Link: https://amzn.to/3Yz4IJA - Raspberry Pi 5. There are different packages and options of the PI buy the one that fits your needs. Using a RPi as a scanner is cpu intensive and you will need one with an active cooler. The one I linked below comes with everything you’ll need for this project and for future projects. The active cooler on this kit works when the Pi is attached to the touch screen. The higher priced kits have an active cooler that requires a case that will not work with the touch screen.
Amazon Link: https://amzn.to/48kbuWR - 7″ Touch screen with built in speakers.
Amazon Link: https://amzn.to/3UhVCOI - USB A to USB A extension cable.
Amazon Link: https://amzn.to/4hiYJjm - You will need a keyboard and mouse to configure SDRTrunk. So any you have laying around or for a dedicated one. I went with a wireless keyboard with a built in touch pad so I can just hide the KB when not in use.
Amazon Link: https://amzn.to/40gRrqm - You will also need an antenna here is a super cheap antenna that didn’t work in my location I had to buy an outside antenna to overcome my home’s construction.
Amazon link: https://amzn.to/4dT195j -Cheap
Amazon link: https://amzn.to/4hjB4PN – Diamond D-130J (Works Great BTW)
Preparing your Raspberry Pi 5 and Flashing the OS to the Pi:
Windows 10 / 11 instructions:
Download the Raspberry Pi imager from the Raspberry Pi website.
Download Link: https://www.raspberrypi.com/software/
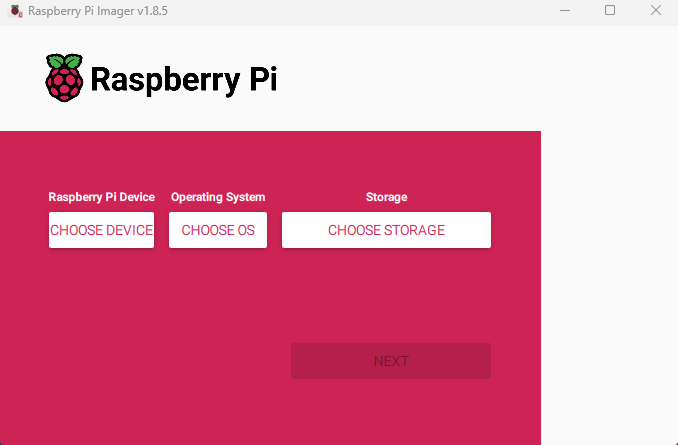
Once you have the imager installed on your Windows PC open the imager. It should look like this:
- Insert your Micro SD card into the reader and insert the reader into your PC. Make note of the drive letter assigned to your Micro SD card by Windows
- Click ‘Choose Device’ and select Raspberry Pi 5
- Click ‘Choose OS’ and scroll down to ‘Raspberry Pi OS (other)’ click that then select ‘Raspberry Pi OS Lite (64-bit)’
- Click ‘Choose Storage’ and select the drive letter of your Micro SD card reader. You can test it by unplugging and reinserting the reader making note of the change in available drives. * Make 100% sure you choose the correct drive because the imager will format the drive you select so DO NOT make a mistake here or you could lose data if you have more than one removable drive attached to your PC. The imager should only detect removable drives.
- Click next and a window will pop up that asks ‘Use OS customization?’
- Click ‘Edit Settings’
- Under General set a host name for your Raspberry Pi 5 I used sdrpi
Set a username and password for your Raspberry Pi 5 (remember this username and password)
Set up WIFI: Enter your WIFI SSID and WIFI password
Set up your locale settings time zone and keyboard
My Settings are pictured below

- Next click ‘Services’ and check enable SSH and either select Use Password auth or Allow public-key auth only. This is your preference for the sake of this guide I am just showing how to do this with password authentication. If you plan to open your Raspberry Pi 5 to the world use a more secure method such as public-key or other more secure methods than a simple password.
- Click ‘Save’
- Click ‘Yes’
- Read the Warning and if you’re satisfied click ‘YES’
- Raspberry Pi Imager will now write your image to the Micro SD card.
- Once it is finished writing the image and verifying it. Remove the card reader and reinsert it back into your Windows PC.
- Open your file explorer and navigate to the the Micro SD card. Find the ‘config.txt’ file and scroll to the section that says:
#Run as fast as firmware / board allows
arm_64bit=1- Add the following text with out the [] on a new line below the arm_64bit=1 [usb_max_current_enable=1]
- Save the config.txt file
- You can now remove the Micro SD card and install it into your raspberry Pi 5
Install the RPi 5 onto the back of the touch screen and connect all the cable according to the touchscreen instructions.
I may make a separate post of the step by step instructions to install the Pi onto the touch screen but it’s pretty straight forward. Connect all of the wires that came with the touch screen to the Pi including the power and ground wires to the GPIO spots. Should be 2 power wires and one ground wire. Connect them to the correct ports on the touch screen. Install the heat sink and fan to the pi if you haven’t already and screw the pi to the back of the touchscreen.
Connect power to the Raspberry Pi 5
Once your Pi boots up you should be able to access it via SSH to install SDRTrunk and other dependencies. You can do this on the Pi with your keyboard and using the touch screen as a monitor but I find it’s easier to use SSH on a larger monitor where I can see better so my instructions are based on using SSH from your windows computer to the Pi. I use Putty as an SSh client you can use Putty or SSH in windows Powershell.
- SSH to your Pi. In My case it’s SSH sdrpi or use SSH 192.168.1.X where you use the correct ip address for your Pi. On my home network I can SSH via hostname you may or may not be able to.
- Once you SSH into your Pi log in with the username and password you set up with the Raspberry Pi Imager.
- Type [sudo raspi-config]
- Select option 1 ‘System Options’
- Select option S5 ‘Boot / Auto Login’
- Select option B2 ‘ Console Autologin
- Use Tab to move the cursor to <OK> and hit enter
- Use Tab to move to <Finish> and hit enter
- Run [sudo apt update]
- Run [sudo apt upgrade]
- Run [sudo apt-get install xserver-xorg x11-xserver-utils xinit openbox rtl-sdr pulseaudio]
- Run [sudo reboot]
- Once the Pi reboots SSH back into the pi
- Run [wget https://github.com/DSheirer/sdrtrunk/releases/download/v0.6.1-beta-2/sdr-trunk-linux-aarch64-v0.6.1-beta-2.zip]
- Run [wget https://github.com/DSheirer/jmbe/releases/download/v1.0.9/jmbe-creator-linux-aarch64-v1.0.9.zip]
- Unzip both of those files you downloaded.
- Run [cd creator-linux-aarch64-v1.0.9]
- Run [cd bin]
- Run [./creator]
- Run [cd ~]
- Run [sudo nano /etc/xdg/openbox/autostart (if you do this from SSH on the PC, make sure to use the -Y flag)]
- Add these lines to autostart file (edit the username in the last line if you use a different one):
- xset s off
- xset s noblank
- xset -dpms setxkbmap -option terminate:ctrl_alt_bksp
- /home/yourusername/sdr-trunk-linux-aarch64-v0.6.1-beta-2/bin/sdr-trunk (– DOUBLE CHECK THIS PATH AND FILE NAME. IF YOU GET AN UPDATED VERSION OF SDR-TRUNK THIS WILL BE DIFFERENT. PUT YOUR CORRECT PATH AND FILE NAME IN THIS SPOT)
- Hit ctrl-x then save the file and exit
- Run [sudo nano ~/.bashrc]
- Add [startx] to the very end of the bashrc file on a new line
- Hit ctrl-x then save the file and exit
- Run [sudo reboot]
- After the reboot SDRtrunk should start and you should be able to see it on your touch screen.
Once SDRTrunk starts
Run the CPU calibration it will take a while and it will only need to be done once.
Under User Preferences Click Decoder and make sure JMBE Audio Library is selected
Under Audio select Output/Tones and make sure your audio device is selected
If you have audio issues where a talk group is showing in your left or right channel in SDRTrunk but no audio is coming from the speakers you’ll need to install Pipewire over top of Pulseaudio. I’ll add those instuctions at the bottom of this post at a later date.
There are a bunch of tutorials for how to set up SDRTrunk so I’ll briefly touch on the basic set up here and some things that I could have used help with.
SDRTrunk Quick and Dirty Set Up
- You’ll need a Radio Reference Account unless you want to manually add every talk group and channel.
- Click on Playlist editor
- Click on Radio Reference
- Enter your login info
- Select Country, State, County
- Select System you want to scan
- Under System View highlight the system you want to add to SDRtrunk
- Since the touchscreen is so small you may have to hold down the alt key on your keyboard and use your finger to move the screen up and down to see the bottom of the screen / window. Holding ALT lets you move the window around with your finger. You’ll have to do this quite a bit when setting up SDRTrunk.
- Move the screen to the bottom where you see options.
- Under frequencies select Control and Alternates
- Under configurations select Single
- Fill in any info you want for system site and name or leave the defaults
- Under alias list click New Alias List and make one
- Click Create Channel Configuration
- Hold ALT and move the window back down so you can see Talkgroup View Click Talkgroup View
- Set Import Alias List to the Alias list you made earlier
- Click Import all Talkgroups
- Click Channels
- Highlight your new channel that should be showing up and do the ALT finger scroll thing to see the bottom of the window and select play.
- The system you selected should be playing if everything went well.
- You can select any number of systems to auto start when the RPi 5 reboots I have my main system set to start on reboot.
- Read the documentation for SDRTrunk to find out how to mute talkgroups and organize things.
- I have several alias lists for different things I might want to listen to while muting things I don’t care about. Keep in mind you need all of the talkgroups in each alias list so don’t try to remove talkgroups you don’t want to hear just mute them instead.
- You can set priority from 1 – 100 1 is high priority and 100 is low priority.
Set up RDIO-Scanner
This is what makes this whole thing really shine in my opinion.
RDIO-Scanner lets you listen, save and select talkgroups from a web browser on your local network or via the internet if you want to while you are away from home. It interfaces with SDRTrunk and saves audio clips for a predetermined amount of time.
- SSH back into your sdrpi and wait until the xwindows message goes away and you have a command prompt
- Run [wget https://github.com/chuot/rdio-scanner/releases/download/v6.6.3/rdio-scanner-linux-arm64-v6.6.3.zip]
- Run [unzip rdio-scanner-linux-arm64-v6.6.3.zip]
- Run [./rdio-scanner -admin_password select your own password]
- Run [sudo nano crontab -e]
- Add [@reboot /home/yourusername/./rdio-scanner] to the end of the file
- Hit CTRL-X save and exit
- Run [sudo reboot]
- After the Pi reboots use a web browser on another computer on your network to go to http://sdrpi:3000/admin
- Enter the password you selected for your admin password above
- Set up RDIO-Scanner following the directions found in the .pdf file that was made when you installed it should be in your home directory.
- In SDRTrunk Click Playlist Editor
- Select Streaming
- Click New and select Rdio Scanner
- Name it and use your ALT and finger to move to the bottom of the page
- Under Name Make a Name any name you want
- Under API-Key enter the API-Key from the admin page of RDIO-Scanner
- System ID any number you want that matches what you have in RDIO-Scanner Admin Page
- Rdioscanner url [http://localhost:3000]
- Max Recording Age 600
- Click the Aliases tab
- Highlight all of the aliases on the left side and click the >> to send them to the right side
- Click the Configuration Tab again
- Click Enabled and then Click Save
- If everything went right you should see ‘Connected’ next to the name on the top of the window and a check mark under enabled.
Hints and tips
In SDRTrunk User Preferences turn off the waterfall as it uses too much CPU and does nothing except look cool.
Select what you want to see on the main screen while SDRtrunk is scanning. I only see the talkgroups and the non-scrolling waterfall. You can move the frame for talk groups up and down to maximize the space it has.
For my set up I am only really interested in scanning the fire department talkgroups so I have everything muted in SDRTrunk but with RDIO-Scanner I can use my phone or web browser to listen to everything or have more control over what I listen to.
If you want to listen away from home set up tailscale and use that to tunnel into your Pi 5 without opening it up to the world. Or you could live dangerously and open port 3000 to the world. If you want you can install an SSL cert and use port 80 / 443 to access RDIO-Scanner after reading the RDIO-Scanner documentation.
I run 2 RTL-SDR dongles one V4 and one V3 on my sdrpi since I sometimes like to listen to two different systems. One would work for me with no issue but it is nice to have two if you can afford it.
ISSUE with AUDIO
If you have an issue where the audio dies and you can’t hear from your touch screen speakers anymore you’ll have to install pipewire.
- SSH back into your sdrpi
- Check if Pipewire is installed (shouldn’t be if you followed just the instructions above)
- Run [systemctl status –user pipewire] Should say “
Unit pipewire.service could not be found“ - Run [
pulseaudio --kill] - Run [
sudo apt remove --purge pulseaudio] - Run [
sudo apt install -y pipewire pipewire-audio-client-libraries pulseaudio-utils] - Run [
sudo apt install -y wireplumber] - Run [
systemctl enable --user pipewire] - Run [
systemctl enable --user wireplumber] - Run [
systemctl start --user pipewire] - Run [
systemctl start --user wireplumber] - Run [
pactl info | grep Server] Should return this:Server String: /run/user/1000/pulse/native Server Protocol Version: 35 Server Name: PulseAudio (on PipeWire 0.3.65) Server Version: 15.0.0 - Run [sudo reboot]
- Now you will have to change your Audio Device in SDRTrunk
- Click View
- Click User Preferences
- Click Audio
- Click Output/Tones
- Click the dropdown and select the only available device.
- Audio might be low! There is a fix for that
If your Audio Is Low After Installing pipewire
- SSH into your sdrpi
- Run [alsamixer]
- This will bring up a graphic user interface adjust the levels to your liking.
- Combine the adjustments you made in alsamixer with the fine tuning available in SDRtrunk by left clicking on the left or right in the main SDRTrunk screen and adjusting the volume.
That’s it! Some of you probably already have the stuff you need to make a really good police and fire scanner for a fraction of the cost of a commercial scanner.
RDIO-Scanner can keep audio recordings for as long as you like but keep in mind you will need a lot of storage to keep them for a long time. I currently have mine set to keep 3 days worth of recordings. RDIO-Scanner records everything all the talk groups and all of the systems you have tied to it. Repeated and continuous writing to a Micro SD card will shorten the life span of the card.
 English